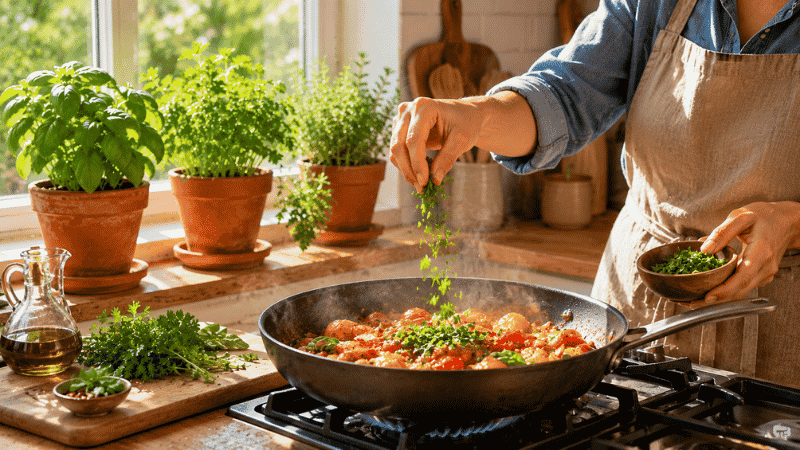
There’s a specific moment that turns a lot of people into gardeners. Not reading about it, not watching a video about it — the moment they actually snip a few leaves of basil they grew themselves and drop them into something they’re cooking. The smell that rises. The satisfaction that’s entirely out of proportion to the effort involved.
An indoor herb garden is where most people have that moment. Not because it’s the easiest thing to grow (though several herbs genuinely are), but because the feedback loop is so immediate and so useful. You grow it. You use it. You eat it. Something that started as a seed or a small pot in a corner of your kitchen ends up on your plate, and that feels remarkable every single time.
This is the complete guide. Whether you have a sun-drenched south-facing window, a dim north-facing apartment, or something in between — this guide will show you exactly how to set up an indoor herb garden that works for your actual space, your actual lifestyle, and your actual cooking.
Key Takeaways
- Most culinary herbs need 6+ hours of direct light daily — matching herbs to your window direction before buying anything is the single most important preparation step
- The grocery store herb pot failure is universal and not your fault — those plants are grown for short-term sale, not long-term home growing
- You can grow a thriving indoor herb garden with as little as $20–$30 in starting costs: a few pots, a bag of potting mix, and two or three seedlings
- Research published in the Journal of Physiological Anthropology (2015) found that routine plant care tasks measurably reduce heart rate, blood pressure, and psychological stress — your herb garden is good for your health beyond the culinary benefits
- Harvesting regularly (at least every 1–2 weeks) makes herbs grow bushier and more productive — neglecting to harvest is the most common reason indoor herb gardens stall
Why an Indoor Herb Garden Is the Perfect Starting Point
Ask any experienced gardener where they’d tell a complete beginner to start, and the answer is almost always herbs. The reasons stack up quickly.
Herbs are edible, which gives every interaction with the garden a sense of purpose. Houseplants are beautiful, but there’s something particularly motivating about growing something you can taste. Every time you snip basil for pasta or mint for tea, you have a tangible result from your effort — and that keeps you engaged in a way that purely decorative plants sometimes don’t.
Most culinary herbs also respond quickly and visibly to good care. Basil can double in size in two weeks with the right conditions. Mint grows so enthusiastically it requires active management. Chives regrow from a haircut within days. This fast feedback loop builds the confidence and intuition that makes you a better gardener across everything else you ever grow.
And practically speaking, growing your own herbs makes economic sense in a way that’s immediately obvious. A single pot of basil at a garden center costs roughly the same as a bunch of fresh basil at the grocery store — but the pot keeps producing for months if you care for it correctly, while the bunch wilts in your fridge within a week. Herbs are one of the clearest cases in home gardening where the economics genuinely favor growing your own.
Before You Buy Anything: Understanding Your Light
This is the step that separates indoor herb gardens that thrive from ones that slowly decline. Before you buy a single herb, spend a day watching your potential growing space.
Light determines everything in an herb garden. The right herb in the wrong light will limp along, produce poorly, and eventually fail — regardless of how attentive your care is. The right herb in the right light practically grows itself.
South-Facing Windows (6–8+ hours direct sun)
The premium position. South-facing windows in the Northern Hemisphere receive the most light throughout the day and are suitable for virtually every culinary herb. This is where you can grow the sun-lovers: basil, rosemary, thyme, oregano, and sage.
East-Facing Windows (4–6 hours morning sun)
Bright morning sun followed by softer afternoon light. Excellent for herbs that prefer some light without the intensity of full afternoon sun. Parsley, chives, cilantro, and mint all do well here. Most Mediterranean herbs manage, though they won’t grow quite as vigorously as in a south window.
West-Facing Windows (4–6 hours afternoon sun)
Afternoon sun can be intense — particularly in summer — but west-facing windows are generally good for herbs. Most culinary herbs perform well here. In very hot climates, afternoon sun intensity can stress basil; position it slightly back from the glass during peak summer heat.
North-Facing Windows (0–3 hours indirect light)
The most challenging position for herbs. Very few culinary herbs produce well in north-facing light — most will grow leggy, pale, and unproductive without supplemental lighting. If this is your primary window, a grow light is not optional; it’s necessary.
The Grow Light Option
For anyone with limited natural light, a small LED grow light transforms what’s possible. Position it 6–12 inches above your herbs and run it for 12–14 hours per day. Modern LED grow lights are energy-efficient, inexpensive (often $15–$30 for a basic unit), and effective. They open up herb gardening to apartments with any window orientation.
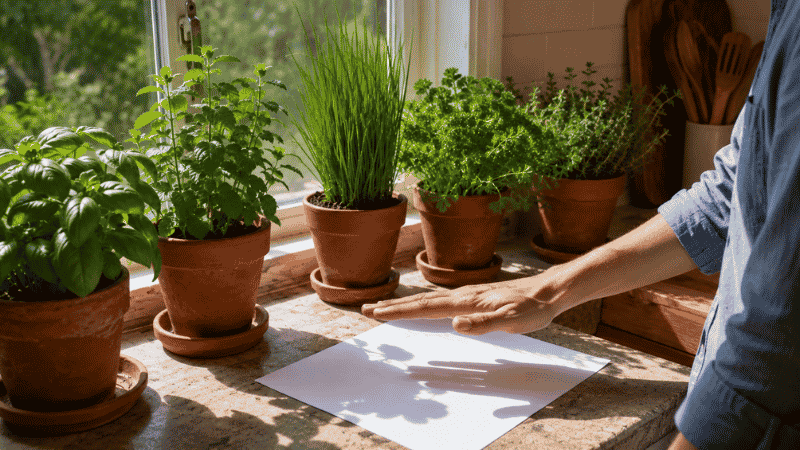
The practical test: hold your hand about a foot above a white piece of paper in your growing spot around noon. A clear, sharp shadow means adequate light for most herbs. A faint or absent shadow means you need to supplement.
The Best Herbs for Indoor Growing: Your Starter List
Not every herb thrives equally indoors. Mediterranean herbs (rosemary, lavender, sage) want intense sun and dry conditions that most homes struggle to provide. Others, like cilantro, bolt quickly in the warmth of a home environment. The following herbs are genuinely well-suited to indoor conditions and are the foundation of every successful indoor herb garden.
Basil — The Gateway Herb
Light: 6+ hours (south window) | Water: Keep consistently moist | Harvest: Top leaves and stems regularly
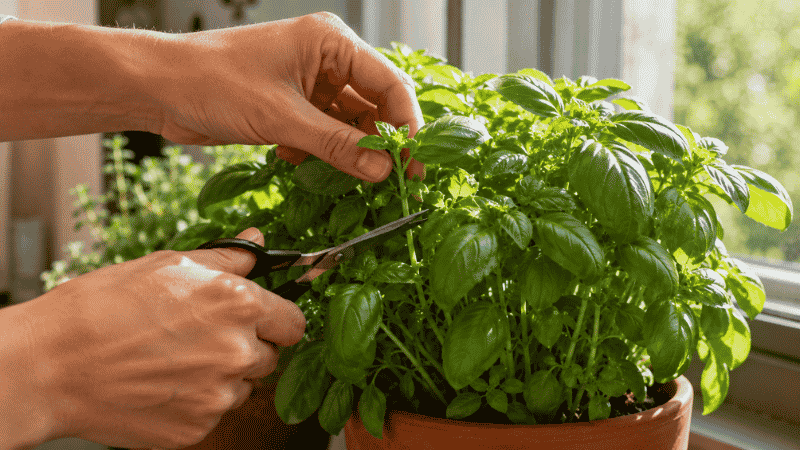
Basil is the most rewarding indoor herb and the one that hooks most people on herb gardening. It grows fast, smells extraordinary, and produces continuously when harvested correctly. The rule is to always harvest from the top — cutting stems just above a pair of leaves — which encourages the plant to branch and become increasingly bushy rather than growing tall and spindly.
The critical habit: pinch off any flower buds the moment they appear. Once basil flowers (bolts), it stops producing flavorful leaves and begins seed production. Catching buds early extends the productive life of your plant significantly.
Basil is also a cold-sensitive tropical plant. Keep it away from drafty windows in winter and never let it experience temperatures below 50°F.
Varieties worth knowing: Genovese (classic Italian, best for pesto), Thai basil (anise flavor, resilient to heat), lemon basil (bright citrus note), purple basil (beautiful and fragrant).
Mint — The Enthusiastic One
Light: 4–6 hours | Water: Keep moist | Harvest: Stems and leaves freely
Mint is nearly impossible to kill and grows with such enthusiasm that it requires its own pot. In a shared container, it will crowd out everything else — give it its own dedicated space and it will reward you with months of fragrant, useful leaves.
The two most important things to know about mint: it wants to stay moist (unlike most herbs, it dislikes drying out between waterings), and it benefits enormously from regular harvesting. A mint plant that isn’t harvested becomes leggy and less productive. Cut it back by a third regularly and it will respond with dense, bushy new growth.
Varieties: spearmint (the classic), peppermint (stronger, better for tea), chocolate mint (a novelty that smells genuinely chocolatey), apple mint (milder and fuzzy).
Chives — The Reliable Workhorse
Light: 4–6 hours | Water: Let top inch dry | Harvest: Cut leaves near the base
Chives are the most low-maintenance herb on this list. They grow steadily without much attention, tolerate a wider range of light conditions than most herbs, and bounce back from both over and underwatering with unusual resilience. Their purple flowers, which appear in spring and summer, are edible and beautiful.
Harvest by cutting leaves close to the base. The plant regrows from the cut points. A single pot of chives, harvested regularly and given a decent window, can produce for years without replacement.
Parsley — The Patient One
Light: 4–6 hours | Water: Let top inch dry | Harvest: Outer stems first
Parsley is slow to establish — expect 3–4 weeks of very little visible activity after planting from seed — but once it gets going, it produces abundantly. Flat-leaf (Italian) parsley has better flavor for cooking; curly parsley is milder but attractive. Both grow well indoors.
Harvest outer stems first, working from the outside of the plant inward. This leaves the center growing point intact and allows the plant to continue developing.
Thyme — The Mediterranean Survivor
Light: 6+ hours | Water: Allow to dry thoroughly | Harvest: Stem tips
Thyme is the most drought-tolerant herb on this list — it prefers to dry out thoroughly between waterings and actually suffers in consistently moist soil. With a sunny south or west window, it grows steadily and requires minimal attention. Regular harvesting of stem tips keeps it compact and productive.
Oregano — The Prolific Producer
Light: 6+ hours | Water: Allow to dry between waterings | Harvest: Stem tips regularly
Oregano grows vigorously in good sun and can become quite bushy over a growing season. It tolerates some drought and dislikes wet feet. Harvest regularly — more than almost any other herb, oregano benefits from being cut back to encourage dense, compact growth rather than long, sparse stems.
Cilantro — The Fast Sprinter
Light: 4–6 hours (cooler position) | Water: Keep moist | Harvest: Outer leaves continuously
Cilantro is the trickiest herb on this list because it has a strong tendency to bolt — to flower and go to seed — in warm indoor conditions. The key is to keep it cooler than most herbs (near a cool window rather than above a stove or radiator), harvest frequently, and plan for succession sowing: plant a new small pot every 3–4 weeks so you always have young, productive cilantro available.
Setting Up Your Indoor Herb Garden: The Practical Guide
Choosing Containers
Each herb should have its own pot — mixing herbs in a shared container only works when their watering needs are identical (mint and parsley can share; thyme and basil cannot). Individual pots also make it easier to replace a struggling herb without disturbing its neighbors.
Pot sizes: 6-inch diameter pots work well for most single herbs. Mint and basil benefit from slightly larger pots (8 inches) as they’re vigorous growers. Thyme, oregano, and chives manage in 4–6 inch pots.
Materials:
- Terracotta: breathable, helps soil dry faster, excellent for overwater-prone herbs (thyme, oregano, rosemary). Dries out faster — check moisture more frequently.
- Plastic or glazed ceramic: holds moisture longer, better for herbs that need consistent moisture (basil, mint, parsley). Lighter weight.
- Self-watering planters: excellent for busy people — the reservoir system maintains consistent moisture without daily attention. Particularly good for basil and parsley.
The non-negotiable: every container must have drainage holes. Herbs in pots without drainage develop root rot within weeks regardless of careful watering.
Soil
Never use garden soil for indoor herbs. It compacts with repeated watering, blocks drainage, and creates the dense, wet conditions that cause root rot.
Use a quality all-purpose potting mix. Add a small amount of perlite (about 20% of the total volume) if the mix feels very dense — this improves drainage and aeration. For Mediterranean herbs (thyme, oregano, rosemary, sage), a 50/50 mix of potting mix and coarse sand or perlite provides the fast-draining conditions they prefer.
Location Options by Setup Type
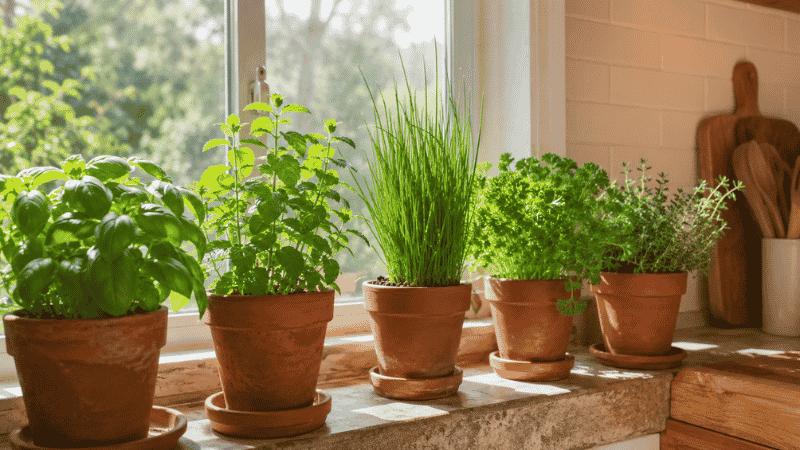
The windowsill garden: the simplest approach. Individual pots arranged on a south or east-facing windowsill. Best for people who want a few herbs for cooking. Start with 3–4 pots. This is the setup most people imagine when they think of an indoor herb garden.
The kitchen counter trio: three herbs in a cluster near the stove — typically basil, chives, and parsley. Convenient for cooking, visually appealing, and manageable. Requires a window nearby for adequate light.
The shelving unit with grow light: a shelf positioned against any wall, with an LED grow light overhead. The window orientation doesn’t matter. This allows herb growing anywhere in the home and can accommodate many more plants. More of an investment but the most flexible and expandable setup.
The hanging herb garden: small pots suspended from a rod or hook near a window. Space-efficient, beautiful, and keeps herbs at a convenient height for harvesting. Best for compact herbs like thyme, chives, and trailing varieties.
Watering Your Indoor Herb Garden
Overwatering kills more indoor herbs than any other cause — more than insufficient light, more than pests, more than poor soil. Understanding how to water correctly is the foundational skill.
The rule: press your finger into the soil. If the top inch feels moist, wait. If it’s dry, water thoroughly — until water drains from the bottom of the pot — then let it dry to that depth before watering again.
By herb type:
- Moisture-lovers (basil, mint, parsley): check every 1–2 days in warm weather; water before they visibly wilt
- Moderate (chives, cilantro): check every 2–3 days; let top inch dry before watering
- Drought-tolerant (thyme, oregano, rosemary, sage): let soil dry almost completely before watering; check every 3–5 days
Water quality: use room-temperature water if possible — cold water from the tap can shock basil in particular. If your tap water is heavily treated, filtering or letting it sit overnight allows some chlorine to dissipate.
Morning watering: water herbs in the morning rather than evening when possible. This gives foliage time to dry before cooler overnight temperatures, which reduces the risk of fungal issues.
Harvesting: The Habit That Makes Everything Work
This is the most underappreciated part of indoor herb gardening. Regular harvesting doesn’t just give you herbs to use — it actively makes the plant healthier and more productive.
Most herbs respond to being cut by producing two new growth points from the cut site. A plant harvested regularly becomes increasingly bushy, producing more leaves per harvest over time. A plant left to grow unchecked produces long, sparse stems with diminishing leaf production — and is much more likely to bolt.
The general rule: never harvest more than one-third of the plant at a time. This leaves enough leaf area for the plant to continue photosynthesizing and recovering.
By herb:
- Basil: cut just above a pair of leaves. The plant branches from that point.
- Mint: cut stems to about 3 inches from the base periodically. New growth emerges enthusiastically.
- Chives: cut leaves close to the base with scissors. Regrowth comes from the base.
- Parsley: harvest outer stems from the base, leaving the inner crown intact.
- Thyme and oregano: snip stem tips. This encourages bushy growth.
Harvest before you need herbs, not after. Making harvesting a regular habit — even when you don’t need the herbs immediately — keeps plants productive. Dried or frozen excess is always useful.
Feeding Your Indoor Herb Garden
Indoor herbs lose nutrients more quickly than outdoor herbs because nutrients wash out with every watering. Without occasional replenishment, even a well-established herb garden will plateau and decline.
A simple feeding routine:
- Mix a slow-release granular fertilizer into the potting mix at planting time — this provides baseline nutrition for 4–6 weeks
- Once established, apply a diluted balanced liquid fertilizer every 3–4 weeks during spring and summer
- Use only half the recommended strength — herbs don’t need heavy feeding and over-fertilizing produces lush but flavorless growth
- Stop feeding in autumn and winter when growth naturally slows
For edible herbs: always choose a fertilizer explicitly labeled as safe for edible plants. Most standard houseplant fertilizers are fine, but check the label.
Common Indoor Herb Garden Problems
Leggy, Pale, Stretched Growth
The plant is reaching for more light. Move it to a brighter position or add a grow light. Pinch back the leggy growth to encourage branching, and address the light issue — the plant will continue growing leggy until the light problem is solved.
Yellowing Leaves
Usually overwatering. Check soil moisture — if it’s consistently damp, reduce watering frequency, ensure the pot drains freely, and consider switching to a more porous pot (terracotta breathes better than plastic). Less commonly: nitrogen deficiency from depleted soil. A dose of liquid fertilizer can help if the soil is appropriate but the plant hasn’t been fed in a long time.
Herb Bolting (Flowering Prematurely)
Bolting is triggered by heat, long days, and water stress. For basil: pinch flower buds immediately when they appear. For cilantro: succession plant every 3–4 weeks in a cooler location. For parsley: provide consistent moisture. Once bolting begins in earnest, the flavor of the leaves deteriorates — harvest heavily and plan to replace the plant.
Fungus Gnats (Tiny Flies Around the Soil)
These small flies lay eggs in the top layer of moist soil. Their larvae eat fine root hairs, which can stress herbs. Prevention: let soil dry out more thoroughly between waterings (this breaks the egg-laying cycle). Treatment: allow the top 2 inches to dry completely, use yellow sticky traps to catch adults, and consider watering from below (setting pots in a shallow tray of water for 20 minutes rather than watering from above) to keep the surface dry.
Brown, Crispy Leaf Tips
Usually caused by low humidity, fluoride sensitivity from tap water, or direct harsh sunlight touching the leaves. Switch to filtered water, move slightly away from the window if in direct contact with glass, and consider adding a small pebble tray with water to increase local humidity.
Year-Round Indoor Herb Gardening: Seasonal Adjustments
Spring (March–May): prime growing season. Start new plants from seed or transplant seedlings. Growth accelerates noticeably.
Summer (June–August): peak production. Water more frequently as temperatures rise and evaporation increases. Harvest aggressively to keep up with growth. Watch for bolting in cilantro and basil.
Autumn (September–November): growth slows. Reduce watering frequency and stop fertilizing. Bring any herbs that summered outdoors back inside before nighttime temperatures drop below 50°F.
Winter (December–February): the most challenging season. Lower light, dry air from heating systems, and naturally slower growth. Reduce watering to match the slower pace. Supplement with a grow light if natural light drops significantly. Focus on the most resilient herbs (chives, thyme, mint) and consider starting fresh basil under a grow light rather than struggling to maintain summer plants.
Starting From Seed vs. Buying Seedlings
Both approaches work — the choice depends on your timeline and budget.
Seedlings (transplants) from a garden center: faster, simpler, and immediately gratifying. You skip the germination wait and start harvesting within weeks. More expensive than seeds per plant, but a significantly lower risk of failure for beginners. The recommended starting point.
From seed: significantly cheaper, especially if you want many plants of the same variety. Requires more patience and a slightly warmer, consistently moist environment for germination. Basil, chives, cilantro, and parsley are the most reliable indoor herbs to grow from seed. Sow in small pots of moistened seed-starting mix, cover loosely until germination, then move to your sunniest window.
The grocery store herb pot problem: grocery store herbs are typically multiple plants crammed into a small pot, grown under industrial lights and in nutrient-depleted conditions, and sold for immediate use rather than long-term growing. They can be rescued by separating the crowded plants into individual pots with fresh soil — but expect a period of adjustment as they transition from their growing conditions to yours. Starting fresh from a garden center seedling or seed is usually a better experience.
Designing Your Indoor Herb Garden: Making It Beautiful
An indoor herb garden can be as decorative as it is functional. A few design principles that make a real difference:
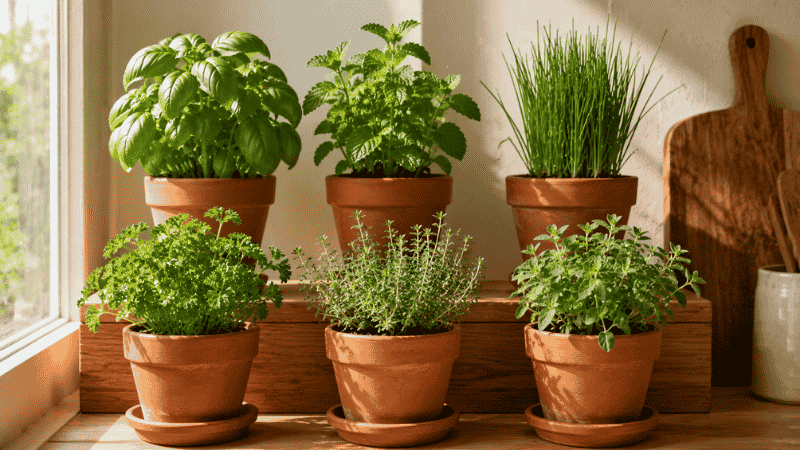
Vary the heights. Tall basil behind, medium-height parsley and chives in the middle, compact thyme in front. Layering creates visual depth.
Use consistent container materials. All terracotta, or all white ceramic, creates a cohesive look even with varied herbs. Mixed random containers look cluttered.
Label your herbs. Simple wooden plant markers, chalk-painted rocks, or handwritten tags make a practical and charming addition — particularly useful when herbs are young and less recognizable.
Group by light needs. Sun-lovers (basil, thyme, oregano) together near the best window; moderate-light herbs (parsley, chives, mint) together in a slightly dimmer spot.
Add a trailing element. Trailing herbs like lemon thyme or creeping rosemary look beautiful allowed to spill over the edge of a pot or shelf.
FAQ
What is the easiest indoor herb garden to start? A simple trio of chives, mint, and parsley in individual 6-inch pots near an east or south-facing window. These three herbs cover a wide range of culinary uses, have different but compatible care needs, and are among the most forgiving of beginner mistakes. Start here, then expand.
How much light does an indoor herb garden need? Most culinary herbs need 6+ hours of direct sunlight for optimal growth. Mediterranean herbs (basil, thyme, oregano, rosemary) need the most sun. Parsley, chives, mint, and cilantro manage on 4–6 hours. North-facing rooms without a grow light are generally not suitable for productive herb gardening.
Can I grow herbs indoors without a sunny window? Yes, with an LED grow light. Position the light 6–12 inches above your herbs and run it for 12–14 hours per day. Modern LED grow lights are affordable and effective — this is the solution for apartments with limited natural light.
Why do my indoor herbs keep dying? The most common causes are overwatering (the leading killer), insufficient light (second most common), and using garden soil instead of potting mix. Check those three things before anything else. Also: grocery store herb pots are designed for immediate use, not long-term growing — if you’re starting with these, separate and repot into individual pots with fresh soil.
Can I grow herbs indoors in winter? Yes, though it requires adjustment. Reduce watering frequency to match slower growth. Supplement with a grow light if your natural light drops significantly. The most winter-hardy indoor herbs are chives, thyme, oregano, and mint. Basil is the most challenging in winter — consider restarting it from seed under a grow light in late winter for a spring harvest.
Do I need special soil for an indoor herb garden? Use a quality all-purpose potting mix — not garden soil, not topsoil. For Mediterranean herbs (thyme, rosemary, oregano, sage), improve drainage by mixing in perlite or coarse sand. Never use garden soil in containers; it compacts and blocks drainage.
How do I stop my herbs from bolting? Harvest regularly (this is the most important prevention measure), keep plants in cooler positions away from direct heat sources, maintain consistent moisture (drought stress triggers bolting), and pinch off any flower buds immediately when they appear — especially in basil.
The Bigger Picture
There’s something that happens when you start an indoor herb garden that’s difficult to fully explain until you’ve experienced it. The process of tending something living — checking it, watering it, harvesting it, watching it grow — creates a rhythm in your day that’s genuinely restorative.
A 2015 study published in the Journal of Physiological Anthropology found that interactions with indoor plants — including routine care tasks like watering and harvesting — measurably reduced heart rate, blood pressure, and self-reported stress compared to computer-based tasks. This effect was strongest for tasks that involved tactile engagement — touching soil, handling leaves.
Your herb garden isn’t just a kitchen utility. It’s a small daily practice of attention, a relationship with something living that responds to your care. The basil you grew tastes better than the basil you bought — not for any chemical reason, but because of what you put into it.
Start with three herbs. Go from there.
Explore the Full DirtZip Herb and Garden Library
- 🌿 [How to Grow Herbs Indoors] — the focused guide to individual herb care and windowsill gardens
- 🍅 [Growing Tomatoes in Pots] — your next step into edible container gardening
- 🥬 [Easiest Vegetables to Grow for Beginners] — expand your edible garden beyond herbs
- 🪴 [Container Gardening: The Complete Beginner’s Guide] — the full framework for growing in pots
- 🌱 [Gardening for Beginners: Grow Your First Garden] — ready to take things further?
References: Lee, M.S., Lee, J., Park, B.J., & Miyazaki, Y. (2015). Interaction with indoor plants may reduce psychological and physiological stress by suppressing autonomic nervous system activity in young adults: a randomized crossover study. Journal of Physiological Anthropology, 34(1), 21. National Gardening Association (2023). Garden to Table: Food Gardening in America. Lange, D., & Schumann, A. (2022). Sensory Benefits of Plant Interaction: A Review of Human Well-Being Studies. Urban Horticulture Journal, 8(2), 112–124. University of Illinois Extension (2023). Growing Herbs Indoors. Old Farmer’s Almanac (2025). How to Grow Herbs Indoors: Step-by-Step and Creative Ideas.