You noticed it a few weeks ago — roots sneaking out of the drainage holes at the bottom of the pot, almost like your plant is trying to escape. Or maybe growth has slowed to a crawl, the soil dries out within a day of watering, and despite your best efforts, your once-thriving pothos just looks a little defeated.
Your plant isn’t sick. It’s not dying. It’s just cramped.
Repotting sounds intimidating to most beginners — there’s something about uprooting a living thing that feels irreversible and risky. But here’s the truth: repotting is one of the kindest things you can do for a houseplant, and it’s much simpler than it looks. Done right, the whole process takes about 15 minutes, costs less than $20 in supplies, and will give your plant a burst of new energy that shows up as fresh growth within weeks.
This guide walks you through every step — when to repot, what you need, how to do it without damaging the roots, and what to expect afterward. Whether this is your first time or you’ve been putting it off for two years, you’ve got this.
Key Takeaways
- Most houseplants need repotting every 1–2 years — roots growing from drainage holes are the clearest signal it’s time
- Always go up only one pot size (1–2 inches larger in diameter) — a pot that’s too big is one of the most common causes of root rot
- Spring is the ideal time to repot, when plants are entering active growth and recover fastest
- Healthy roots are white and firm; brown or mushy roots indicate rot and should be trimmed before repotting
- After repotting, keep the plant in indirect light and hold off on fertilizing for 4–6 weeks while it settles in
How Do You Know When It’s Time to Repot a Plant?
This is the question most beginners wrestle with, because there’s no universal schedule. Different plants grow at different rates, and a fast-growing pothos will outgrow its pot far sooner than a slow-growing ZZ plant. Rather than repotting on a calendar, look for these specific signals.
Roots growing from drainage holes is the clearest sign. When roots start escaping through the bottom, the plant has run out of room and is actively searching for more space. This is not an emergency — your plant won’t die tomorrow — but it is a reliable signal that repotting should happen soon.
Soil dries out unusually fast is the second most common sign. When a pot is mostly roots with very little soil left, water runs straight through without being absorbed properly. If you’re watering far more frequently than usual and the soil seems dry within a day or two, the root-to-soil ratio has shifted too far.
Growth has slowed or stopped during the active growing season (spring and summer) despite regular watering and fertilizing suggests the plant has hit a wall. Roots that have circled the pot can’t absorb nutrients efficiently — new growth stalls because the plant is struggling, not thriving.
The plant looks visually top-heavy or is repeatedly tipping over because the above-ground growth has outpaced the pot size is another clear cue.
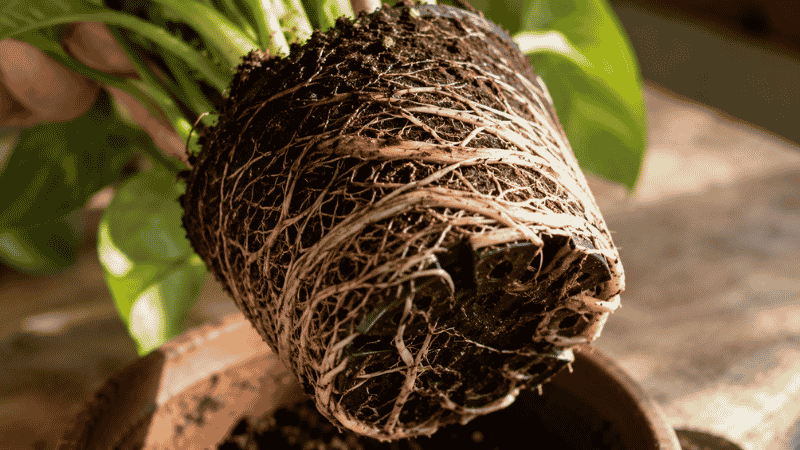
According to Penn State Extension’s plant care guidelines, a sure sign that repotting is needed is when roots are so dense that you can barely see any potting mix in the bottom third of the root ball when you slide the plant out for inspection.
If you’re seeing one or more of these signs, it’s time.
When Is the Best Time to Repot a Houseplant?
Spring is ideal — March through May in most of North America. This is when houseplants naturally shift from winter dormancy into active growth. Roots that have been repotted in spring have the entire growing season ahead of them to establish in fresh soil, and the plant will produce visible new growth relatively quickly as a sign of recovery.
Summer works too, particularly for tropical plants that stay actively growing throughout warm months.
Avoid repotting in winter whenever possible. Most houseplants slow down significantly in the colder, darker months, and a plant that’s been disturbed while dormant is slower to recover. Roots that have been loosened and repotted need energy to reestablish — and in winter, that energy simply isn’t there.
The one exception: if a plant is in acute distress — severe root rot, a pot that has cracked from root pressure, or soil that’s completely exhausted — repot regardless of season. A necessary repot in November is better than waiting until March for a plant that’s actively struggling.
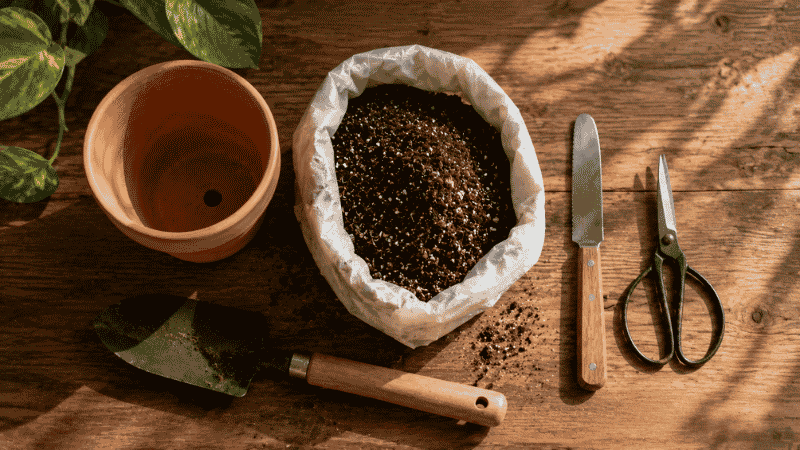
What You Need Before You Start
Gathering everything before you begin makes the process much calmer. You don’t need many things.
- A new pot — 1 to 2 inches larger in diameter than the current one, with drainage holes
- Fresh potting mix — standard all-purpose potting mix works for most houseplants; cactus mix for succulents
- A trowel or old spoon — for adding soil around the roots
- A butter knife or chopstick — useful for loosening a plant that’s stuck
- Newspaper or a tray — to catch the mess (optional but saves cleanup time)
- Scissors or pruning shears — to trim any damaged roots
That’s genuinely all you need. No special equipment, no expensive products.
One important note on pot size: the most common repotting mistake is going too large. A pot that’s dramatically bigger than the root ball holds far more soil than the roots can absorb, that excess soil stays wet, and wet soil without roots to drink it is a breeding ground for root rot. One to two inches larger. That’s the rule.
How to Repot a Plant: Step by Step
Step 1: Water Your Plant 24 Hours Before
Water your plant the day before you plan to repot. Moist soil holds together better around the root ball, which makes removal easier and reduces the shock of having roots exposed. Dry soil crumbles and falls away, leaving roots bare and vulnerable during the process.
Don’t waterlog it — just a normal thorough watering is enough.
Step 2: Prepare Your New Pot
Add a small layer of fresh potting mix to the bottom of the new pot — just enough so that when you place your plant inside, the base of the stem sits slightly below the pot’s rim (about an inch). This leaves room for watering without overflow.
If your new pot has very large drainage holes, you can place a piece of mesh or a coffee filter over the hole before adding soil — this lets water drain freely without losing soil every time you water.
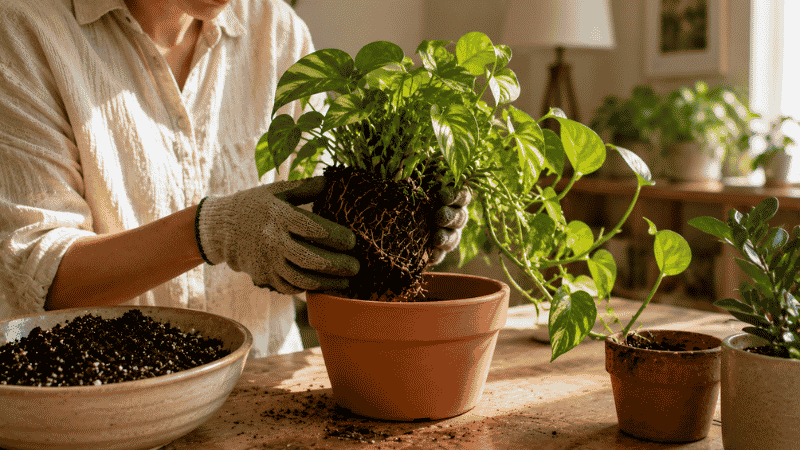
Step 3: Remove the Plant from Its Current Pot
This step worries most beginners, but it’s usually easier than expected.
For plastic pots: gently squeeze the sides of the pot to loosen the soil, then tilt the pot on its side and slide the plant out while supporting the base of the plant with your other hand.
For ceramic or terra cotta pots: run a butter knife or thin spatula around the inside edge between the soil and the pot wall. This breaks the seal and allows the root ball to slide free. Tilt the pot and let gravity help.
If the plant is truly stuck, tap the bottom of the pot firmly against a table while holding the plant upside-down. The root ball will eventually drop free. Be patient — this sometimes takes a minute.
Once out, look at the roots. Healthy roots are white or light tan and feel firm. Brown or black roots that feel mushy indicate rot — these need to be trimmed away with clean scissors before repotting. Don’t panic if you find a few; remove the affected roots, let the remaining roots air-dry for 30 minutes, and proceed.
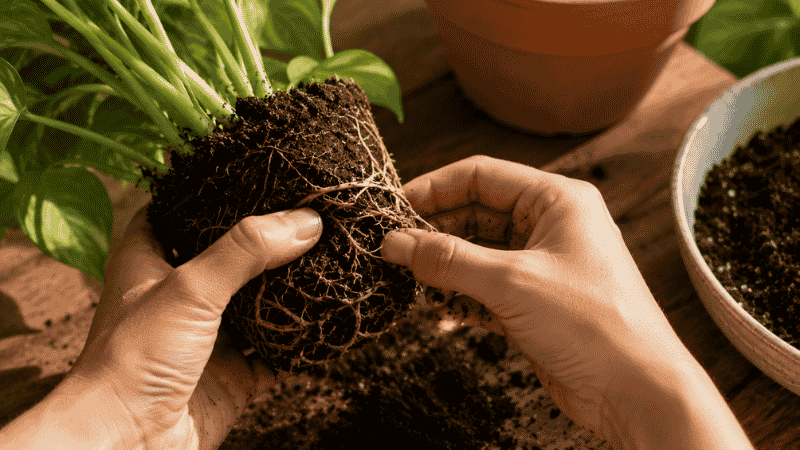
Step 4: Loosen and Untangle the Roots
This is the step Swansons Nursery calls “massaging the root ball” — and it’s genuinely important. When roots have been circling a pot, they continue growing in that circular pattern even after repotting, which limits how well they establish in the new space.
Gently work your fingers through the roots at the bottom and sides of the root ball, loosening any that are tightly coiled. You may lose a few fine roots in the process — that’s completely normal and not harmful. The goal is to free the roots so they can grow outward into the new soil rather than continuing to circle.
Don’t aggressively pull or break thick roots. Gentle massaging of the outer root mass is enough.
Step 5: Place the Plant and Fill with Fresh Soil
Set the plant into the new pot on top of the soil layer you prepared. Check that the base of the stem sits at roughly the same depth it was in the old pot — planting too deep can cause stem rot, and planting too shallow leaves roots exposed.
Fill in around the sides with fresh potting mix, pressing gently as you go to eliminate large air pockets. Don’t pack the soil down hard — roots need some air circulation. Leave about an inch of space between the soil surface and the top of the pot to allow for watering.
Step 6: Water Thoroughly and Find a Gentle Spot
Water the newly repotted plant thoroughly until water drains from the bottom. This settles the soil around the roots and gives the plant its first drink in its new home.
For the next 2–4 weeks, keep the plant in bright indirect light rather than its usual spot if that spot receives strong direct sun. A freshly repotted plant is temporarily more vulnerable to stress, and reducing light intensity while it establishes new roots is a simple way to ease the transition.
Hold off on fertilizing for 4–6 weeks. Fresh potting mix already contains nutrients, and adding fertilizer to a stressed root system can cause more harm than good.
What to Expect After Repotting
A newly repotted plant will often look the same or even slightly worse for 1–3 weeks before it shows improvement. This is normal — the plant is directing energy underground to establish new roots before it produces new leaves.
The sign of a successful repot is new growth. A fresh leaf unfurling, a new stem emerging, a plant that looks visibly more upright and settled than it did. This typically appears 3–6 weeks after repotting, sometimes sooner for fast-growing plants like pothos or philodendrons.
Some plants drop a leaf or two after repotting — this is a stress response, not a sign of failure. If the plant is otherwise looking healthy (firm stems, no yellowing beyond 1–2 leaves), give it time.
If You Only Have 10 Minutes
Short on time but your plant really needs repotting? Here’s the minimum viable version:
Skip the full root massage. Just slide the plant out, place it into a pot that’s one size larger, fill around the sides with fresh potting mix, water once, and you’re done. It’s not as thorough as the full process, but it’s significantly better than leaving a severely rootbound plant in a too-small pot.
A partial repot done today beats a perfect repot that never happens.
Warning Signs: When Repotting Needs More Attention
Most repots are straightforward, but occasionally you’ll find something that needs addressing before you proceed:
Extensive root rot (majority of roots brown and mushy) — trim away all affected roots aggressively, let the remaining roots air-dry for an hour, and repot into fresh dry soil. Do not water for several days after repotting to give the remaining root system a chance to recover.
Pests in the soil — if you notice tiny white insects, webbing, or small larvae in the root ball, this is an opportunity to deal with the infestation. Remove as much of the old soil as possible, rinse the roots under lukewarm water, and repot into completely fresh soil. Treat the plant with neem oil or insecticidal soap after repotting.
A plant that’s dramatically too rootbound — if roots have completely filled the pot and are forming a dense, tight ball with no visible soil, loosen the roots more aggressively than usual and consider trimming up to one-third of the outer root mass to give the plant a genuinely fresh start.
FAQ
How often should you repot a houseplant? Most houseplants benefit from repotting every 1–2 years. Fast-growing plants like pothos, philodendron, and spider plants may need repotting annually. Slow-growing plants like snake plants, ZZ plants, and succulents can often go 2–3 years between repots. Watch for the signs rather than following a fixed schedule.
Can repotting kill a plant? Repotting very rarely kills a healthy plant when done correctly. The biggest risks are repotting into a pot that’s too large (which leads to root rot from waterlogged soil) or repotting during winter dormancy (which slows recovery). If a plant is already unhealthy, repotting into fresh soil often helps rather than hurts.
Should I water a plant immediately after repotting? Yes — water thoroughly immediately after repotting to settle the soil around the roots and give the plant its first drink in its new environment. After this initial watering, allow the soil to dry appropriately for the plant type before the next watering.
What soil should I use when repotting? For most tropical houseplants (pothos, philodendron, peace lily, monstera), standard all-purpose potting mix works well. For succulents and cacti, use a cactus and succulent mix or add perlite to standard potting mix to improve drainage. Never use garden soil in containers — it compacts and prevents drainage.
Can I repot a plant that’s flowering or fruiting? It’s better to wait until flowering is complete. Repotting stresses a plant, and that stress can cause flowers to drop prematurely. If the plant is severely rootbound and in distress, repot anyway — but be prepared for some flower loss.
My plant looks worse after repotting — did I do something wrong? Not necessarily. A brief period of looking droopy or slightly sad is normal as the plant adjusts to its new environment and establishes new roots. Give it 2–3 weeks in indirect light before making any judgments. New growth appearing is the clearest sign that the repot was successful.
What’s the difference between repotting and potting up? These terms are often used interchangeably, but there’s a subtle distinction. “Repotting” technically refers to refreshing the soil in the same or similarly-sized pot. “Potting up” refers specifically to moving a plant into a larger container. In practice, most people use both terms to mean moving a plant into fresh soil, sometimes in a bigger pot.
A Small But Meaningful Act
There’s something quietly satisfying about repotting a plant. You’re doing something real — something with your hands, with soil, with a living thing — that makes an immediate and visible difference. In a week or two, when you see a fresh leaf unfurling from a plant that looked stuck and tired, you’ll understand why plant people find this hobby so rewarding.
It doesn’t have to be perfect. It just has to happen.
Keep Growing
- 🌿 [Best Plants for Beginners: 15 Picks That Are Actually Hard to Kill] — find your perfect first plant
- 🪴 [Low Maintenance Indoor Plants: 12 Hard-to-Kill Picks] — plants that forgive mistakes and thrive anyway
- 🌱 [Gardening for Beginners: Grow Your First Garden] — ready to take things further?
References: Penn State Extension (2023). Repotting Houseplants. North Carolina State University Extension (2022). How to Repot a Houseplant. Swansons Nursery (2021). How to Repot a Plant. The Sill (2024). How to Pot or Repot Your Houseplants Step By Step. University of Maryland Extension (2023). Overwatered Indoor Plants.