
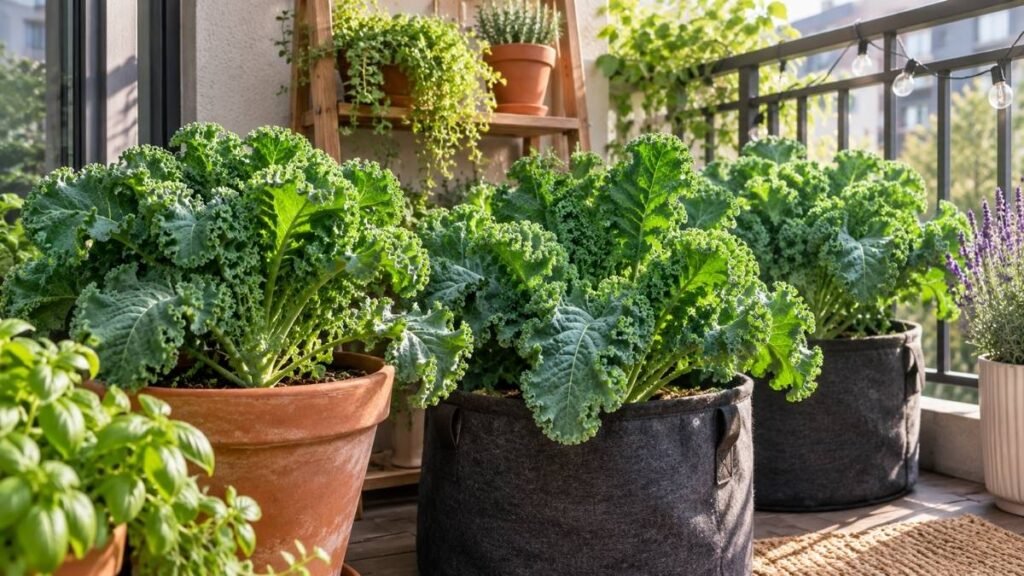
Kale has a bit of a reputation — a trendy smoothie ingredient, a slightly intimidating superfood, the kind of vegetable that seems like it belongs in the gardens of experienced growers. In reality, it’s one of the most forgiving crops you can grow, making it a great choice for anyone starting a home garden with a small balcony, a modest budget, or no experience at all.
After helping new gardeners troubleshoot their kale, we noticed one common pattern: disappointing harvests rarely came from a lack of gardening skill. More often, the real problems were poor timing, harvesting too aggressively, or trying to grow kale through the hottest part of summer. If you’ve been searching for how to grow kale, this guide focuses on those practical details. From choosing the right variety to harvesting without stopping new growth, you’ll learn how to grow kale with confidence and enjoy fresh leaves from your own containers, balcony, or backyard.
Quick Answer: The Essentials
Here’s what you need to know before diving in:
- Sow seeds about ¼ inch deep.
- Expect germination in roughly 3–7 days.
- Space mature plants about 12 inches apart.
- Use one plant per 10–12 inch wide container.
- Grow in full sun, or partial shade in warmer climates.
- Plant mainly in spring or late summer for a fall harvest.
- Harvest outer leaves only, always protecting the center growing point.
- First mature harvest typically arrives in 50–60 days.
| Factor | Guideline |
|---|---|
| Planting depth | ~¼ inch |
| Germination time | 3–7 days |
| Mature plant spacing | ~12 inches |
| Container size | 10–12 inch pot per plant |
| Light needs | Full sun; partial shade in heat |
| Best planting season | Spring or late summer |
| Time to first harvest | ~50–60 days |
With those basics in mind, let’s get into the details that actually determine whether your kale thrives or struggles.
Choose the Best Kale Variety for Beginners
Before buying seeds, think about both how you want to grow kale and how you plan to use it in the kitchen. The right variety makes the whole experience more enjoyable from harvest to dinner.
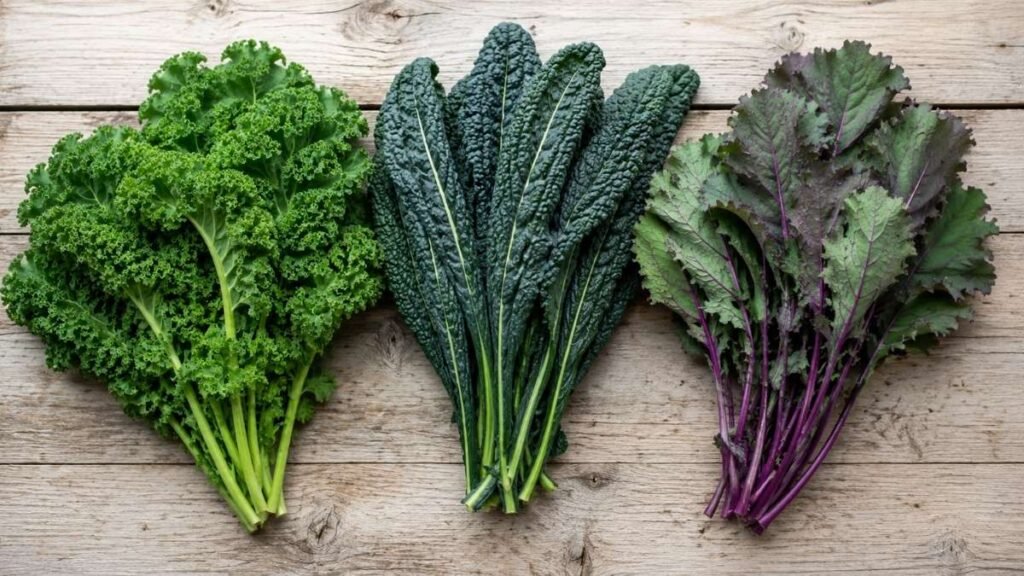
Curly Kale
Curly kale is the variety most people picture first — ruffled, deep green leaves with a slightly chewy texture. It holds up well in soups, sautés, and roasted kale chips, and it’s widely available as seed, which makes it an easy default for a first attempt.
Lacinato or Dinosaur Kale
Also called Tuscan kale, this variety has long, deeply crinkled, almost bumpy leaves in a darker blue-green shade. It’s more tender than curly kale, cooks down beautifully, and tends to be a favorite for anyone using kale mostly in cooked dishes rather than raw salads.
Red Russian Kale
Red Russian has flatter, more tender leaves with reddish-purple stems, and it’s noticeably milder and sweeter than the other two — especially after a light frost. It’s a strong choice if raw salads are the main goal, since it doesn’t have the tougher texture some people find off-putting in curly kale.
Best Kale Variety for Beginners
If you’re not sure where to start, curly kale or Red Russian are both solid, low-fuss choices. It’s worth pausing here on something that catches a lot of first-time growers off guard: a variety can be genuinely easy to grow and still feel like a disappointment if its texture doesn’t match how your household actually eats it. Someone hoping for tender salad greens who ends up with a thick, chewy curly kale harvest often assumes they did something wrong — when really, it’s just a mismatch between variety and expectations.
| Variety | Flavor | Leaf Texture | Cold Tolerance | Container Suitability | Best Kitchen Use | Beginner Friendliness |
|---|---|---|---|---|---|---|
| Curly Kale | Slightly bitter, earthy | Firm, ruffled | Excellent | Very good | Chips, sautés, soups | High |
| Lacinato (Dinosaur) | Mild, nutty | Tender, crinkled | Good | Very good | Cooked dishes | High |
| Red Russian | Mild, slightly sweet | Flat, tender | Good | Good | Salads, light cooking | Medium-High |
For more ideas on what else grows well in a beginner setup, our guide to the easiest vegetables to grow is a good next stop.
Choose kale based on both your growing conditions and how you actually plan to eat it.
Plant Kale at the Right Time for Better Harvests
Unlike tomatoes or peppers, kale grows best in cool weather. Plant it at the right time, and you’ll usually end up with healthier plants, sweeter leaves, and a much longer harvest.
Spring vs. Fall Planting
Kale is a cool-season crop, which means it grows best when temperatures are mild — think light jacket weather, not shorts and sandals. You can plant in early spring for a late-spring and early-summer harvest, or in late summer for a fall crop, ideally sown about 6–8 weeks before your area’s first expected frost.
Planting in the height of summer is where a lot of beginners run into trouble. It’s a surprisingly common experience to plant kale in July, watch it struggle, wilt, and taste bitter, and quietly conclude “I guess I just can’t grow this” — when really, the plant was simply asked to grow during the one season it likes least. Once the timing shifts to spring or fall, the same seeds and the same care routine often produce a completely different result.
How Much Sun Kale Needs
In cool weather, kale wants full sun — at least 6 hours a day. In warmer conditions, a bit of partial shade during the hottest part of the day actually helps prevent stress and bitterness.
Choosing Well-Drained Soil
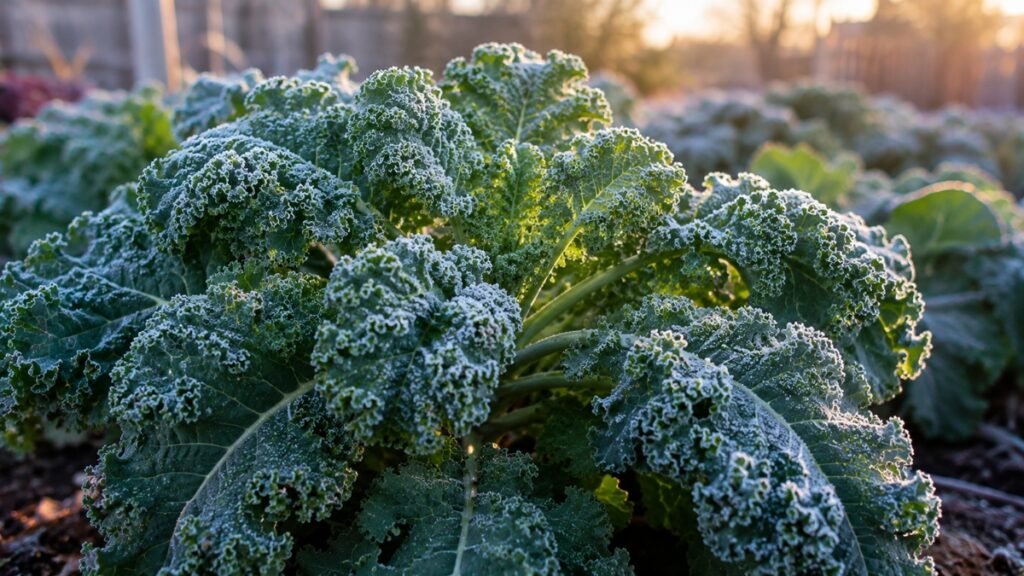
Kale prefers soil that drains well but holds onto some moisture, enriched with compost or other organic matter. It grows fine in ground beds, raised beds, or containers, as long as drainage is solid. And here’s something that tends to surprise new gardeners: a light frost usually improves kale rather than damaging it, often making the leaves noticeably sweeter.
| Comparison | Spring Planting | Fall Planting |
|---|---|---|
| Timing | Early spring, as soil is workable | 6–8 weeks before first frost |
| Main challenge | Race against rising summer heat | Timing sowing correctly |
| Pest pressure | Moderate to high | Generally lower |
| Flavor | Good, can turn bitter in heat | Often sweeter, especially after frost |
| Harvest window | Shorter before heat arrives | Longer, into and through cool weather |
How to Plant Kale Seeds and Seedlings
Kale is easy to plant, but a few small details make a big difference. Seeds should stay shallow, seedlings need room to spread, and crowded sprouts should be thinned early. Get those basics right, and the plants usually settle in quickly.
Direct Sow or Start Indoors?
Both work well with kale. Direct sowing is simpler and skips the transplant step entirely, which suits most beginners. Starting seeds indoors — in something as simple as a yogurt cup or egg carton with drainage holes poked in the bottom — can be useful if you want a head start before the outdoor season is ready, or if you’re working around unpredictable weather.
Sow the Seeds
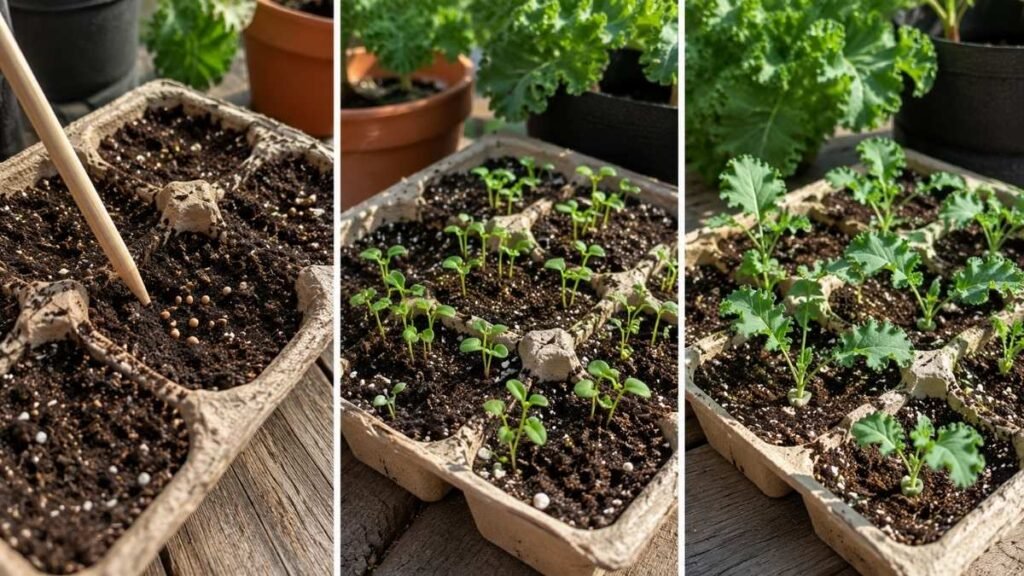
Plant seeds about ¼ inch deep and keep the soil evenly moist while you wait for germination, which typically takes 3–7 days.
Thin and Transplant Seedlings
Once seedlings have their first true leaves, thin them so mature plants end up spaced about 12 inches apart. This step feels counterintuitive to a lot of first-time growers — it’s genuinely common to leave every seedling in place because pulling healthy-looking sprouts feels wasteful. In practice, though, crowded seedlings compete for light, water, and root space, which usually produces a cluster of weak, stunted plants instead of the fuller harvest people are hoping for.
If you started seeds indoors, harden seedlings off gradually over several days before transplanting, and when moving them into their final spot, keep the central growing point at soil level rather than burying it.
Kale Planting Checklist
- [ ] Warm or cool-season timing confirmed
- [ ] Container or bed prepared
- [ ] Seeds planted at correct depth (~¼ inch)
- [ ] Soil kept moist but not waterlogged
- [ ] Seedlings thinned
- [ ] Final spacing established (~12 inches)
How to Grow Kale in Pots, Containers, and Small Spaces
A single pot, a grow bag, or a sunny balcony can produce fresh leaves for months with very little space. The key is choosing the right container and giving the roots enough room to grow.
Choose the Right Container
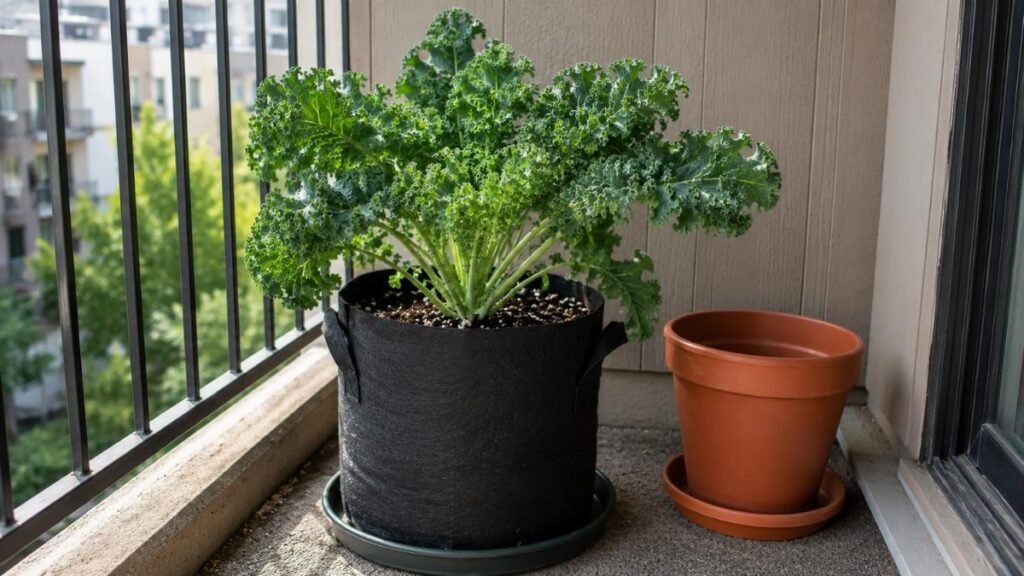
Aim for a pot at least 10–12 inches wide and deep, with one mature plant per container. Fabric grow bags, plastic pots, or repurposed containers all work, as long as they have solid drainage holes.
Set Up the Potting Mix and Drainage
Use a lightweight potting mix rather than garden soil, which tends to compact and drain poorly in containers. Good drainage matters more here than almost anywhere else in this guide — it’s the difference between a plant that thrives and one that quietly rots from the roots up.
Position Kale for Balcony Light
Orient containers toward whichever direction gets the longest sun exposure. If your balcony only offers 3–4 hours of direct light, that’s workable — kale tolerates partial shade better than most vegetables, though growth will be a bit slower. Move pots during heatwaves or hard freezes if you can, since containers are more exposed to temperature swings than in-ground soil.
Grow Baby Kale in Less Space
If you’re short on room, growing several plants closely together for baby-leaf harvests is a completely different approach from growing one large mature plant — and it’s worth knowing the difference going in. A single, well-spaced plant will keep producing full-size leaves for months. A denser planting of baby kale gets harvested young and often, but each planting has a shorter overall lifespan. Neither is “better” — it depends on whether you want a handful of big leaves regularly, or smaller, more frequent cuttings.
| Container Width | Container Depth | Approximate Volume | Mature Plants | Harvest Style |
|---|---|---|---|---|
| 10 inches | 10–12 inches | ~3 gallons | 1 | Mature, cut-and-come-again |
| 14–16 inches | 12 inches | ~5 gallons | 2 | Mature or baby leaf |
| Shallow tray, 12+ inches | 6–8 inches | ~2 gallons | Several, closely spaced | Baby kale only |
Balcony Kale Setup Checklist
- [ ] Drainage holes confirmed
- [ ] Lightweight potting mix added
- [ ] One mature plant per pot (or several for baby leaves)
- [ ] Light exposure checked
- [ ] Water runoff controlled
- [ ] Pest netting planned
For more on setting up containers well in general, our container gardening guide covers sizing and drainage basics in more depth.
How to Keep Kale Healthy All Season
Once the plants start growing well, a steady routine of watering, light feeding, and a quick weekly check is usually enough to keep them healthy and productive.
Water Consistently
Check soil moisture before watering rather than following a fixed schedule — if the top inch or two feels dry, it’s time to water at soil level, avoiding the leaves where possible. One thing that tends to produce noticeably better leaves over time: keeping moisture steady, rather than letting a container dry out completely and then soaking it heavily to compensate. That swing between drought and flood stresses the plant more than either extreme on its own.
Feed Lightly
A layer of compost at planting gives kale a solid start, and a light, nitrogen-supporting fertilizer during active growth helps keep leaf production steady. It’s worth being cautious with concentrated homemade fertilizers or strong compost tea — kale responds better to gentle, consistent feeding than to occasional heavy doses.
Keep Plants Clean and Open
Remove yellowing or damaged lower leaves as they appear, and keep some airflow around mature plants by not overcrowding them. This helps prevent the damp, still conditions that pests and disease tend to favor.
| Task | Frequency | What to Check | Signs Adjustment Is Needed |
|---|---|---|---|
| Watering | 2–3 times weekly, adjust by weather | Top 1–2 inches of soil | Wilting or constantly soggy soil |
| Feeding | Light feed every 3–4 weeks | Leaf color and growth rate | Pale leaves, slow growth |
| Leaf cleanup | Weekly | Yellow or damaged lower leaves | Buildup of decaying leaves |
| General check | Weekly | Pests, airflow, soil moisture | Any sudden change in appearance |
For more on getting watering rhythm right in pots specifically, see our guide on how often to water potted plants.
How to Protect Kale from Common Pests
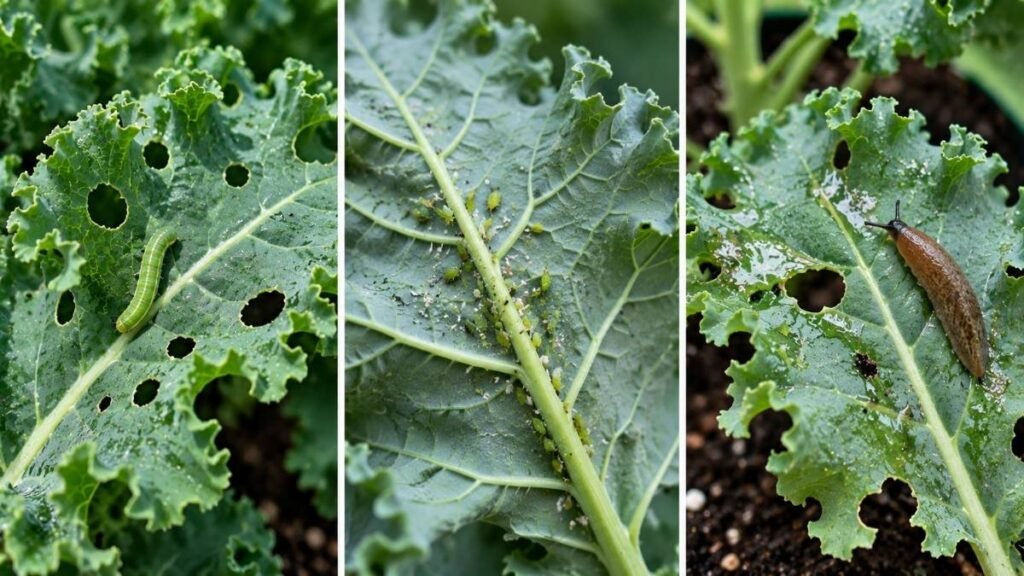
Finding holes in your kale leaves can be frustrating, especially when the plants were growing well just a few days earlier. Most cabbage worms, aphids, and slugs are easy to manage if you spot them early and check your plants regularly.
Stop Cabbage Worms Before They Hatch
Small white butterflies fluttering around your plants are an early warning sign, not just a pretty visitor — they’re often laying eggs on the underside of leaves that will hatch into cabbage worms. Checking leaf undersides regularly and installing fine insect mesh right after planting is the single most effective way to prevent an infestation before it starts.
Remove Aphids Early
Aphids show up as small clusters, often with a sticky residue on nearby leaves. Rinsing them off with a strong spray of water, or wiping them away by hand, is usually enough when caught early.
Control Slugs Around Containers
Slug damage shows up as ragged holes, often worse after rain or overnight. Simple physical barriers around containers, along with a quick nighttime check with a flashlight, go a long way toward keeping numbers down.
When a Low-Toxicity Treatment Is Necessary
For persistent aphid problems, insecticidal soap is a reasonable, lower-impact option — but it’s worth treating it as a backup rather than a first response. Physical prevention almost always outperforms treating an established problem.
| Pest | Visible Signs | Prevention | Immediate Action | When to Remove a Leaf |
|---|---|---|---|---|
| Cabbage worms | Chewed holes, small green caterpillars | Insect mesh, egg checks | Hand-pick eggs and worms | If heavily chewed or fouled |
| Aphids | Clusters, sticky residue | Regular inspection | Rinse or wipe off | If colony is dense and leaf is weak |
| Slugs | Ragged holes, slime trails | Physical barriers, night checks | Remove slugs by hand | If leaf is mostly destroyed |
There’s a pattern worth remembering here: by the time large, obvious holes show up in the leaves, prevention has usually already failed. Installing mesh early, before any sign of trouble, is a much easier strategy than trying to catch up once pests are established.
Weekly Kale Pest Check
- [ ] Inspect leaf tops
- [ ] Inspect leaf undersides
- [ ] Look for eggs
- [ ] Check the center growth point
- [ ] Check soil edges for slugs
- [ ] Repair gaps in insect mesh
How to Harvest Kale So It Keeps Growing
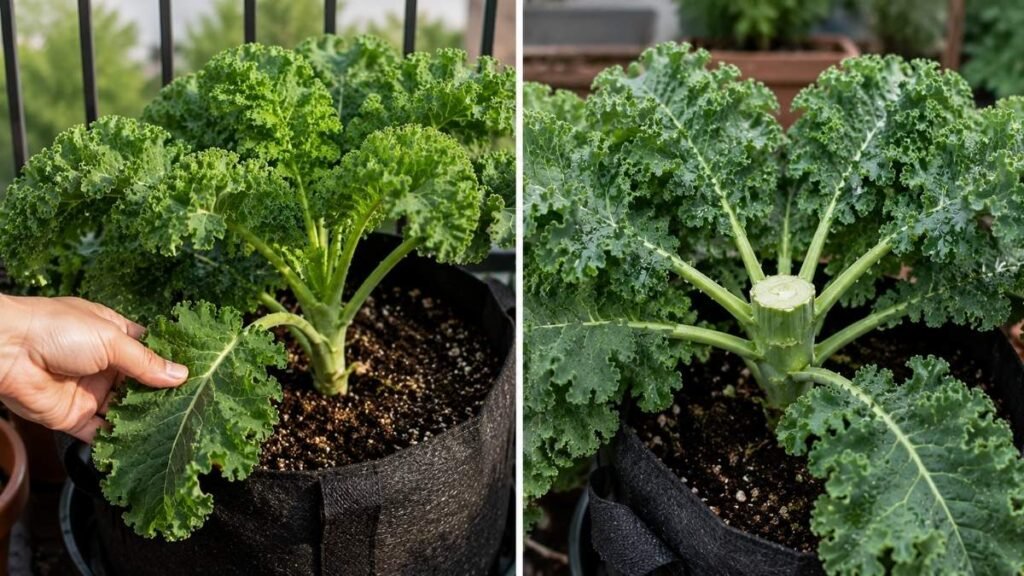
It’s tempting to pick the biggest leaves all at once, especially when your kale finally looks ready. Harvesting a few outer leaves at a time and leaving the center untouched helps the plant keep producing fresh growth for weeks or even months.
Know Which Leaves to Pick
Start with the lowest, outermost leaves — these mature first and are ready to go before the leaves higher up. Choose full-size, healthy leaves rather than picking randomly across the plant.
Protect the Center Growing Point
This is the single most important rule with kale: never cut or damage the central growing point at the top of the plant. That’s where all future leaves come from, and damaging it effectively ends the plant’s productive life. It’s a genuinely easy mistake to make the first time — cutting the whole top off at once, the way you might harvest a bunch of herbs, feels efficient, but it stops new growth completely instead of encouraging it.
Harvest Little and Often
Take just a few outer leaves from each plant at a time, leaving several healthy leaves in place to keep the plant fueled. Harvesting this way every few days, rather than stripping the plant all at once, keeps production going steadily. Baby kale, grown more densely, gets snipped young across the whole planting rather than leaf by leaf.
Store Fresh Kale
Wash leaves and store them in the refrigerator, where they’ll typically stay fresh for about a week. Fresh-picked kale works well raw in salads and smoothies, or cooked down and crisped into chips.
Three Rules for Continuous Kale Harvests
- [ ] Pick outer leaves first
- [ ] Leave several healthy leaves on the plant
- [ ] Never damage the center growing point
Why Your Kale Turns Bitter, Bolts, Yellows, or Stops Growing
Kale doesn’t always stay green and productive all season. Leaves can turn bitter, plants may bolt in warm weather, or growth can suddenly slow down.
Why Kale Tastes Bitter
Bitterness usually comes from heat stress, inconsistent watering, or simply an older, more mature plant. Cooler weather and steady watering generally improve flavor, and interestingly, a light frost can make leaves noticeably sweeter rather than harming them.
What to Do When Kale Bolts
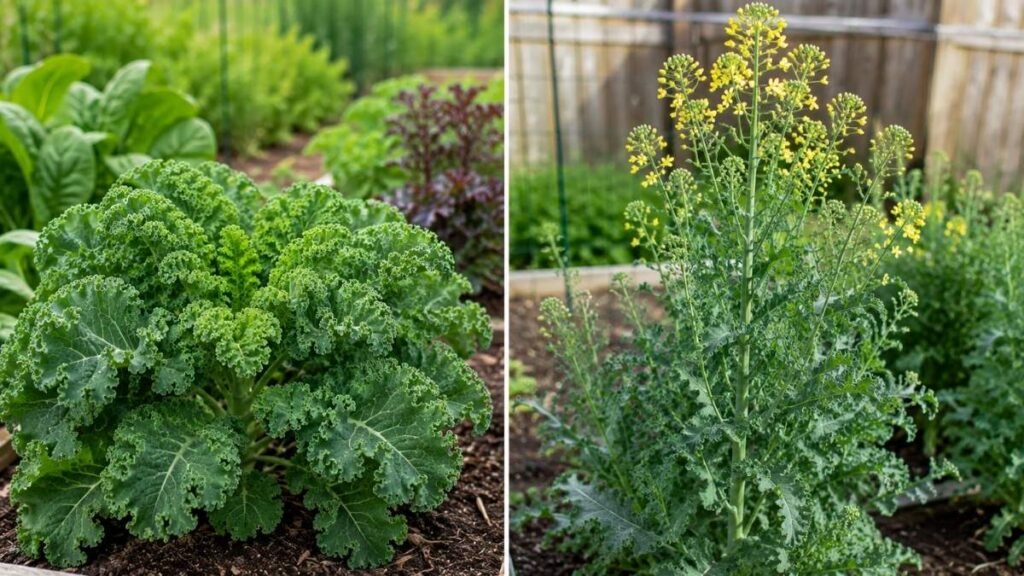
Bolting — when the plant sends up a tall flower stalk — is typically triggered by heat, plant age, or a shift in season. Once a flower stalk appears, you can still harvest the remaining leaves, but flavor tends to decline quickly after that point. If the whole plant is bolting heavily, it’s usually time to remove it and start a fresh planting rather than waiting for leaf production to resume.
Why Leaves Turn Yellow
A few yellow lower leaves here and there is normal aging and nothing to worry about. Widespread yellowing across the plant more often points to overwatering or a nutrient shortage.
Why Growth Has Slowed
Slow growth usually comes down to one of a few familiar culprits: not enough light, overcrowded spacing, cold soil early in the season, or a container that’s become too small for the root system. Containers also dry out faster than garden soil, so wilting in pots often shows up before it would in the ground.
Will Kale Grow Again Next Year?
Kale is technically a biennial — it can survive winter in many climates and resume growth the following year. That said, it’s worth setting realistic expectations here: a plant pausing during a summer heatwave is very different from a plant that has moved into its second year. Second-year kale plants typically shift their energy toward flowering and seed production rather than producing the tender leaves you’re after, so most home gardeners get better results treating kale as an annual and replanting each season rather than counting on strong regrowth.
Quick Kale Problem Diagnosis
- [ ] Check recent temperatures
- [ ] Check soil moisture
- [ ] Check container size
- [ ] Check plant spacing
- [ ] Check center growth point
- [ ] Check whether a flower stalk is forming
Frequently Asked Questions
How do you correctly harvest kale so it keeps growing all season? Pick a few outer, lower leaves at a time and leave the center growing point completely untouched. Harvesting little and often, rather than stripping the plant at once, keeps it producing for months.
When is the best time to plant kale: spring or fall? Both work well since kale is a cool-season crop. Spring planting gives an earlier harvest before summer heat arrives, while planting in late summer — about 6–8 weeks before your first frost — often produces sweeter leaves and a longer harvest window.
How do you keep cabbage worms and aphids off kale naturally? Install fine insect mesh right after planting to block cabbage moths before they lay eggs, check leaf undersides regularly, and rinse off small aphid colonies with water. Catching both early avoids the need for stronger treatments later.
Is kale a perennial plant, and will it come back every year? Kale is technically biennial and can survive into a second year in many climates, but second-year plants usually focus on flowering rather than producing tender leaves. Most home gardeners get better results replanting kale annually.
Does frost really make kale taste better, and can it survive freezing winter weather? Yes — a light frost typically sweetens kale’s flavor rather than damaging it, and established plants tolerate cold remarkably well. Hard, prolonged freezes are more likely to cause damage than a light frost.
What should you do when kale starts flowering or bolting? You can still harvest the leaves that remain, but flavor usually declines quickly after a flower stalk appears. If the whole plant is bolting, it’s typically best to remove it and start a new planting.
Can you successfully grow kale in containers or pots on a balcony? Yes. A container at least 10–12 inches wide and deep, filled with a lightweight potting mix and set up with good drainage, comfortably supports one mature kale plant for repeated harvests.
Which variety of kale is easiest to grow for beginners? Curly kale and Red Russian kale are both solid starting points — reliable growers with widely available seed. The better choice ultimately comes down to whether you plan to eat kale mostly raw (Red Russian) or cooked (curly).
🏠 Behind This Guide
Growing kale isn’t about having a big garden—it’s about getting a few simple things right.
That’s why this guide focuses on practical steps that beginners can actually follow, whether you’re planting in a backyard, a raised bed, or a single container on a balcony.
This guide is built around three essentials:
- 🌱 Plant at the Right Time — Take advantage of cool weather for sweeter leaves and healthier plants.
- 💧 Keep Care Simple — Water consistently, feed lightly, and solve common problems before they spread.
- 🥬 Harvest for Continuous Growth — Pick outer leaves the right way so your kale keeps producing for weeks or even months.
Because growing kale isn’t about doing everything perfectly.
It’s about enjoying fresh harvests with confidence, season after season.
🌿 Continue Growing Your Garden
Growing kale is just the beginning of a rewarding home garden. These beginner-friendly guides will help you expand your harvest, make better use of small spaces, and grow more vegetables with confidence.
- How to Grow Lettuce — Learn how to grow crisp, fresh lettuce at home with simple planting, watering, and harvesting tips for beginners.
- How to Grow Herbs Indoors — Discover the easiest herbs to grow inside your home, even if you only have a sunny windowsill.
- How to Grow Green Beans — Follow a step-by-step guide to growing productive green bean plants in garden beds, raised beds, or containers.
❤️ A Final Note
Every garden starts with a single seed and the confidence to grow it.
At DirtZip, we’re here to make gardening simple, practical, and enjoyable with beginner-friendly guides that help you grow healthier plants and avoid common mistakes.
Because every thriving garden begins with one small step.